How to Stencil for Cupcakes { Tutorial }
October 11, 2012 |
| { Carry On (with your canoe) and Have a Cupcake! } |
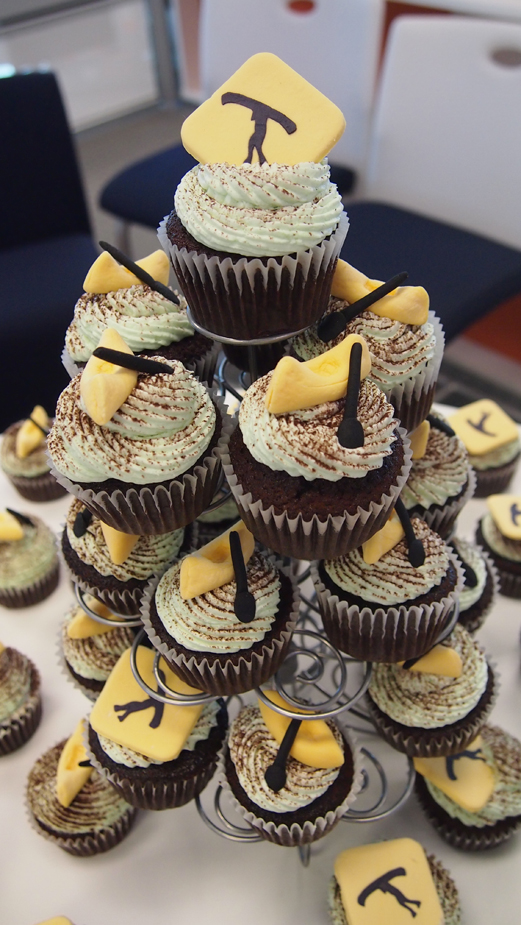
My partner and I put together these cupcakes for a colleague's farewell to show off his adventurous and outdoor personality. I followed the process from Sweetopia on how to stencil cookies using royal icing and translated it onto fondants. I also created my own stencil using plastic transparency. It was pretty simple to do. I just need to cut out the shape using an exact-o-knife.
Materials
- Fondants (I made my own fondant from marshmallow, see here)
- Colouring gel
- Rolling pin
- Angled spatula
- Royal icing
- Square cutter (or a square shaped lid of a tin can)
- Stencil (DIY your own or store bought stencil)
- Exact-o-knife
Instructions:
1. Roll out your fondants
2. Use a square cutter (or a square shaped lid of a tin can), cut out pieces of square from the fondant.
3. Let them dry while you work on the canoes
Lay them flat and let dry. Make sure they are not touching each other. While you're waiting, roll the remaining fondant into long strands, approximately 1/2" thick. Cut them with a sharp knife to no larger than 2 inches long. Those will be the body of the canoes.
4. Squeeze and Poke
- Squeeze both ends of the fondant to shape like a canoe.
- Add some powdered sugar if marshmallow fondant gets sticky.
- Using the tip of the chopstick, poke in the middle to form the inside.
- Then, with black fondant, roll another long thin strand about 1/8" thick and cut them into 3/4" long.
- These will be the sticks of the paddle.
- Roll some black fondants into a small ball and "glue" them to one end of the black strand with bit of water.
- Press the ball flat to form the paddle.
- Let all pieces dry for few hours or until harden.
5. Create Your Stencil

- While you leave your fondants to dry, create your stencil. This can be any images you wish and in this case, I googled up a portage graphic to use.
- Print it out on a piece of paper, making sure the size of the image is within the size of your square fondants.
- With a plastic transparency, trace and carefully cut out the shape using an exact-o-knife.
6. Stencil with Royal Icing

- Mix some royal icing with tiny bit of water to start until toothpaste consistency. Add black colour gel with toothpick into the royal icing, until you get a dark enough colour.
- Stir until colour are blended.
- Trim a small hole at the corner of the zip loc bag and squeeze the royal icing towards the hole.
- Put your stencil over the dried square fondant.
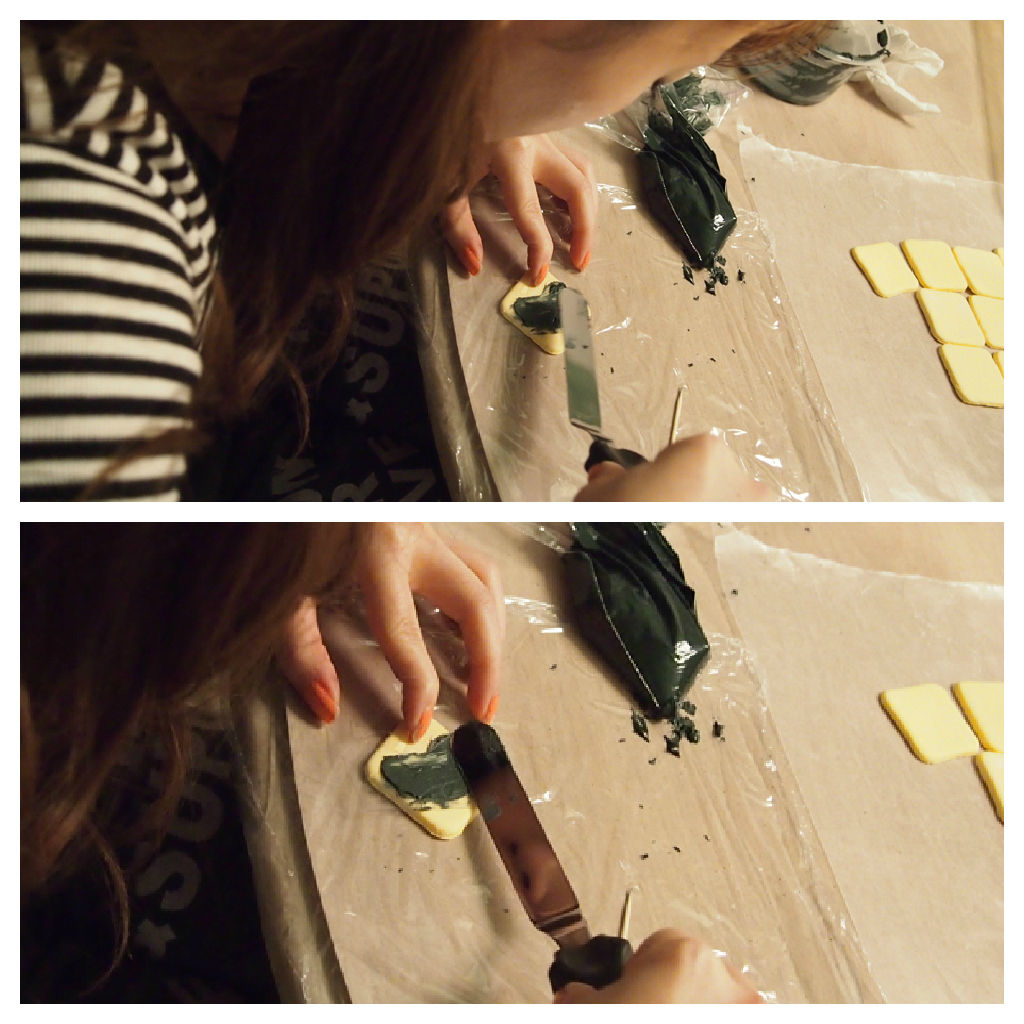
- Apply black royal icing on top of stencil, filling all gaps (careful not to move or lift up the stencil).
7. Scrape Off Excess
 With an angled spatula, scrape off excess royal icing carefully (don't lift up your stencil)
8. Peel Off Stencil
9. Place Fondants Over Cupcakes

Now, put your fondant decorations over frosted cupcakes sprinkled with cocoa powder. Who said men and cupcakes don't go well together?
Happy canoeing!

![About [span]me[/span]](https://4.bp.blogspot.com/-W94gFRK3HZk/WAxRYOaXwZI/AAAAAAAAKCE/fdvqF_Mb15U9H6GvcTkLc_6It8gi0F-bACLcB/s1600/profile7.png)


![About [span]me[/span]](https://lh3.googleusercontent.com/-fG275Js3bYg/VwPktKSTOnI/AAAAAAAAGmg/MbxDMHmuPE0SqUpOlhvpqftw2T1-LO4PwCCo/s608-Ic42/profile5.png)

0 comments
I'd love to hear your thoughts and comments! Come back soon :)